Tutorial: DAST app scans using Zed Attack Proxy
Zed Attack Proxy (ZAP) is a free, open-source penetration tool for testing web applications. ZAP runs as a "man-in-the-middle proxy" between the tester's browser and the web app. You can use ZAP to run penetration testing to simulate a malicious external attack and use the results to protect your app from unauthorized access and denial-of-service attacks.
In this tutorial, you'll set up a simple pipeline with a Zap step that scans the app and ingests the results into STO.
-
This tutorial has the following prerequisites:
- A Harness account and STO module license.
- A basic understanding of key STO concepts and good practices.
- A working instance of the web app you want to scan. Your app must be accessible from your Harness pipeline.
- Docker requirements:
- A Docker Hub account and access token.
- A Docker connector is required to push the image.
- Your Docker Hub access token must be stored as a Harness secret.
Set up your app instance
If you don't have your web app running yet, you can go through this tutorial by scanning an instance of the Google Gruyere app.
To create an instance of this app for scanning, go to Start Gruyere.
Set up your pipeline
Do the following:
-
Select Security Testing Orchestration (left menu, top) > Pipelines > Create a Pipeline. Enter a name and click Start.
-
In the new pipeline, select Add stage > Security.
-
Set up your stage as follows:
-
Enter a Stage Name.
-
Unselect Clone Codebase.
-
-
Go to Infrastructure and select Cloud, Linux, and AMD64 for the infrastructure, OS, and architecture.
You can also use a Kubernetes or Docker build infrastructure, but these require additional work to set up. For more information, go to Set up a build infrastructure for STO.
Add the Zap step
Harness provides a set of customized steps that make it easy to set up popular scanners such as ZAP.
- Visual
- YAML
-
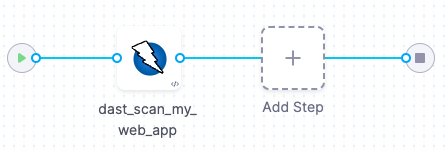
In Execution, add a Zap step.
-
Configure the step as follows:
-
Name =
dast_scan_my_web_app -
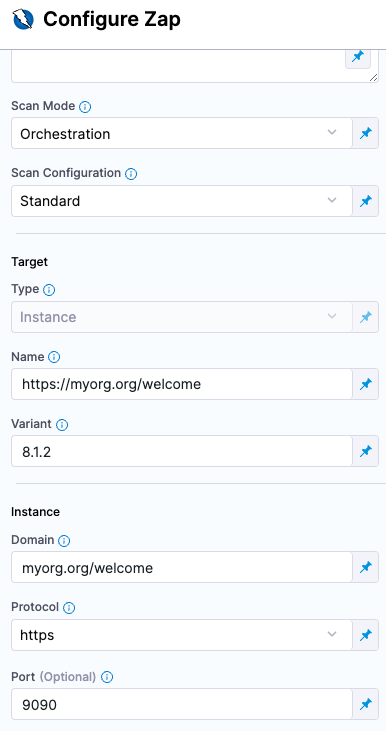
Scan Mode = Orchestration
-
Set the following fields based on the app you're scanning.
For example, suppose you're scanning version 8.1.2 of
https://myorg.org:9090/welcome. You could then set the fields like this:-
Target Name =
myorg.org/welcome -
Target Variant =
8.1.2 -
Instance Domain =
myorg.org/welcome -
Instance Protocol = https
-
Instance Port =
9090
If you're scanning a Google Gruyere instance, set the fields like this:
-
Target Name =
https://google-gruyere.appspot.com/ -
Target Variant = MY_APP_INSTANCE_ID
-
Instance Domain =
https://google-gruyere.appspot.com/MY_APP_INSTANCE_ID -
Instance Protocol = https
-
-
Fail on Severity = Critical
-
Add a Zap step and set the following fields based on the web app you want to scan. For example, suppose you're scanning version 8.1.2 of https://myorg.org/welcome:9090. You could then set the fields like this:
type:Zapname:A name for the step.identifier:A unique step ID.spec :mode :orchestrationconfig: default # | standard | attack | quicktarget :name : https://myorg.org/welcometype : instancevariant : 8.1.2port : 9090
advanced :log :level : info
fail_on_severity: critical
Here's a YAML example for scanning a Google Gruyere instance:
- step:
    type: Zap
    name: dast_scan_my_web_app
    identifier: dast_scan_my_web_app
    spec:
      mode: orchestration
      config: standard # | standard | attack | quick
      target:
        name: https://google-gruyere.appspot.com
        type: instance
        variant: MY_APP_INSTANCE_ID
      advanced:
        log:
          level: info
        fail_on_severity: critical
      instance:
        domain: https://google-gruyere.appspot.com/MY_APP_INSTANCE_ID
        protocol: https
Run the pipeline and check your results
-
Run the pipeline and then wait for the execution to finish.
-
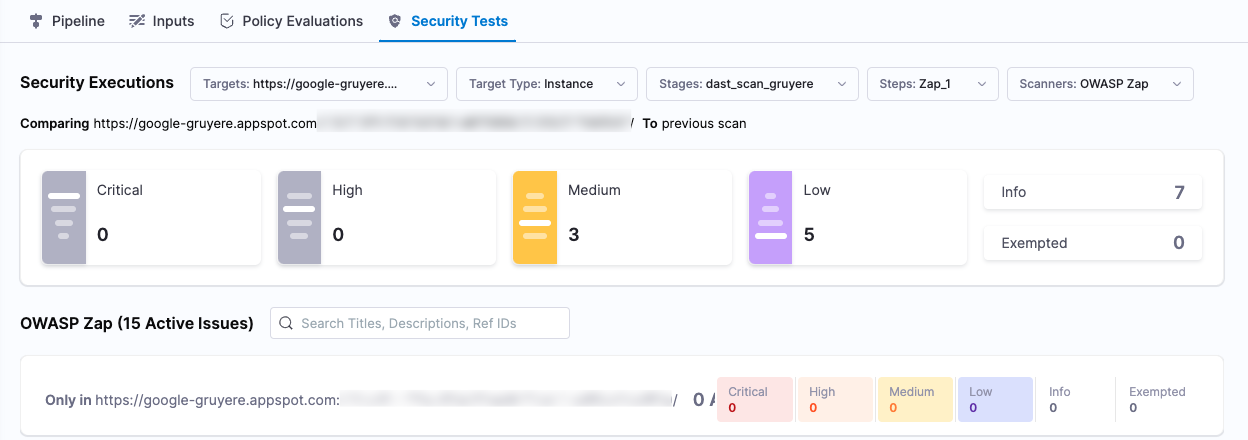
Select Vulnerabilities tab and examine any issues detected by your scan.
Specify the baseline
It is good practice to specify a baseline for every target. Defining a baseline makes it easy for developers to drill down into "shift-left" issues in downstream variants and security personnel to drill down into "shift-right" issues in the baseline.
-
Select Test Targets (left menu).
-
Select the baseline you want for your target.

YAML pipeline example
Here's an example of the pipeline you created in this tutorial. If you copy this example, replace the placeholder values with appropriate values for your project, organization, and app instance ID.
pipeline:
  name: v1-dast-zap-scan-gruyere-test
  identifier: v1dastzapscangruyeretest
  projectIdentifier: YOUR_HARNESS_PROJECT_ID
  orgIdentifier: YOUR_HARNESS_ORGANIZATION_ID
  tags: {}
  stages:
    - stage:
        name: dast_stage_scan_gruyere
        identifier: dast_stage_scan_gruyere
        description: ""
        type: SecurityTests
        spec:
          cloneCodebase: false
          platform:
            os: Linux
            arch: Amd64
          runtime:
            type: Cloud
            spec: {}
          execution:
            steps:
              - step:
                  type: Zap
                  name: zap_step_scan_gruyere
                  identifier: zap_step_scan_gruyere
                  spec:
                    mode: orchestration
                    config: standard
                    target:
                      name: https://google-gruyere.appspot.com
                      type: instance
                      variant: YOUR_APP_INSTANCE_ID
                    advanced:
                      log:
                        level: info
                      fail_on_severity: critical
                    instance:
                      domain: https://google-gruyere.appspot.com/YOUR_APP_INSTANCE_ID
                      protocol: https